
Licensed amateur radio operators can connect to EchoLink repeaters or individual users without needing an RF radio. This is particularly valuable for hams who travel and want to stay in touch with their home region or explore repeaters around the globe. Many repeaters now integrate EchoLink as a digital bridge, allowing remote users to communicate as if they were operating locally. Additionally you can post short text messages that all Echolink users of that repeater can all see. This is great for net meetings since the all the call signs of all connected Echolink users are automatically visible to all. Furthermore, some “Conferences” use the shared text message section to augment trivia questions or similar, which helps generate group conversations. (e.g. K6FN Coffee Shop). Wikipedia link has more information.
Getting Started
Use your phone or tablet without requiring a radio (apple or android). The information below relates to an Apple iPad or iPhone, but should be similar for androids.
Three Basic steps
- Download install and configure the app
- Setup your account which requires sending proof of your ham certificate or similar.
- Use the map to select a repeater you want to monitor or chat on, and start talking.
What you will see
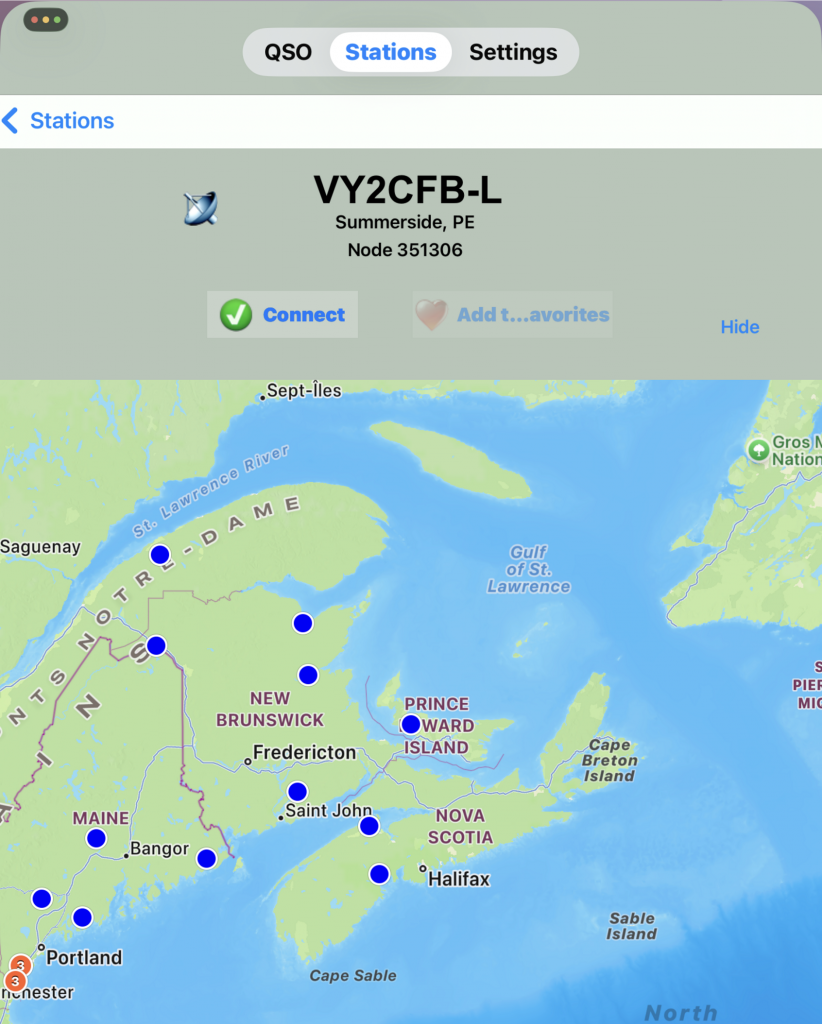
This is what the normal day to day screens look like after you complete the first two steps. In the map view simply click on a blue dot which represents a repeater. The connect button lets you join that station (repeater/user). Note that some conferences set maximum limits for performance reasons.
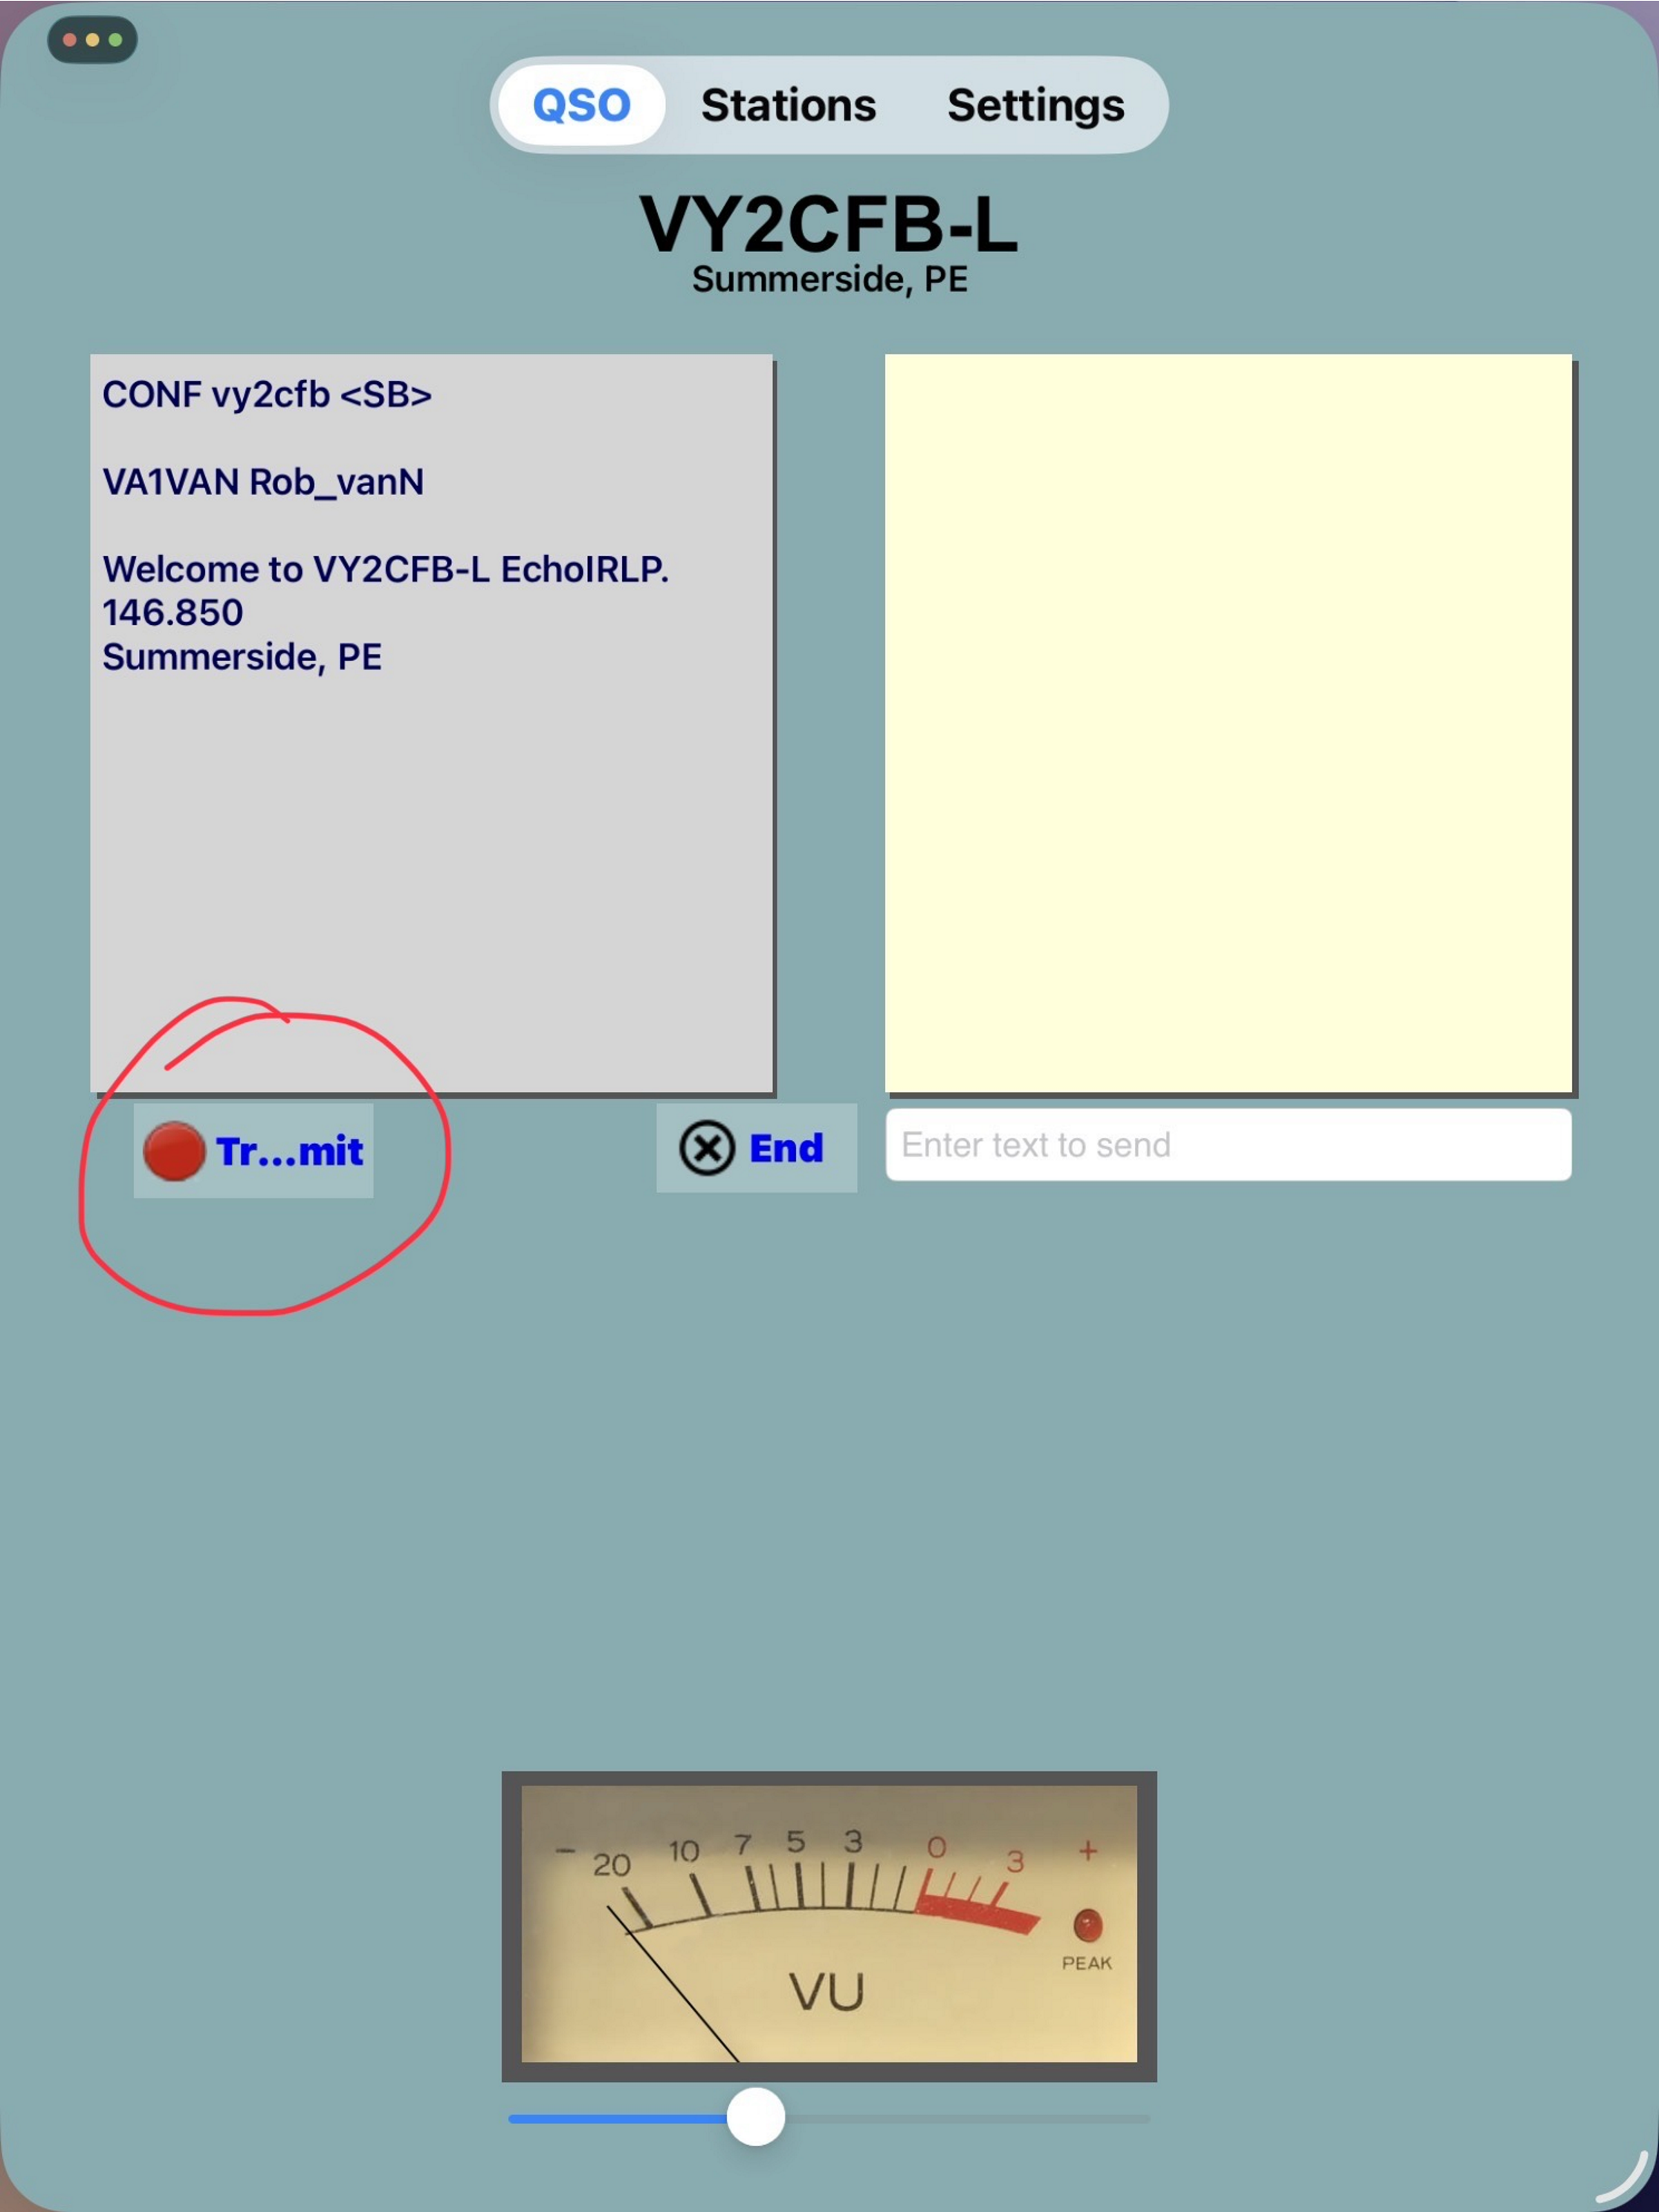
Once you are successfully connected to that station this screen shows all connected users in the left panel, as well as station information about the host. The system will let you transmit only if no one else is transmitting, so this helps eliminate pile ups during net meetings. The notepad panel on the right is used to see/type notes from the host and/or other connected users. VU meter shows the audio volume level.

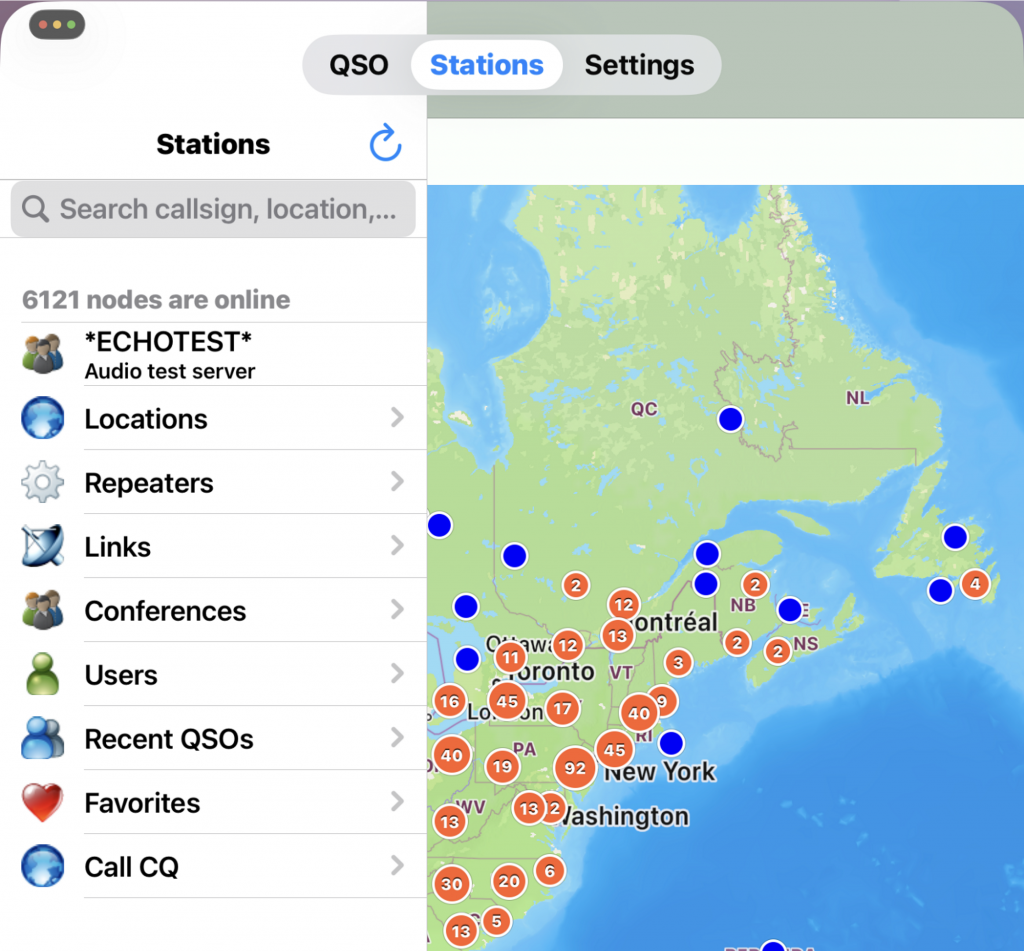
The Stations view shows the various types of stations that can be accessed, including favorites and an EchoTest one to help ensure your audio levels are ok.
Detailed installation information
(The following was generated using AI)
AppStore app
📱 First‑Time Installation & Setup Guide
EchoLink App for iPad (iOS)
- Install the App
– Open the **App Store** on your iPad.
– Search for **“EchoLink”** (developer: *Synergenics, LLC*).
– Tap **Get** → **Install**.
– Once installed, open the app.
—
2. Allow Required Permissions
When you launch EchoLink for the first time, it will ask for:
– **Microphone access** (required for QSOs)
– **Local network access** (helps with connectivity)
– **Notifications** (optional)
Grant microphone and network permissions to avoid audio issues later.
—
3. Create or Enter Your EchoLink Account
EchoLink requires a **valid amateur radio callsign**.
### If you already have an EchoLink account:
– Enter your **callsign** and **password**.
– Tap **Sign In**.
### If you are new to EchoLink:
– Tap **Register**.
– Enter:
– Your **callsign**
– Your **email**
– A **password** of your choice
After registering, you must complete **callsign validation** (next step).
—
4. Complete Callsign Validation (One‑Time Requirement)
EchoLink must verify that you are a licensed amateur radio operator.
You will receive an email with instructions. Validation usually requires **one** of the following:
– Uploading a scan/photo of your amateur radio license
– Using an automated database check (works in many countries)
– Sending a verification email from the address listed on your license
Once validated, your account becomes active.
—
5. Log In After Validation
Return to the app:
– Enter your **callsign** and **password**
– Tap **Sign In**
You should now see:
– **Stations List**
– **Repeater/Link nodes**
– **Search**
– **Favorites**
– **QSO screen**
—
6. Configure Audio (Important for iPad)
Go to **Settings → Audio**:
– Select **Built‑in Mic** for transmit
– Select **Speaker** or **Headphones** for receive
– Set **VOX** or **PTT** depending on your preference
– Most operators prefer **PTT** on iPad for reliability
—
7. Test Your Setup
A great first test is the **EchoLink Test Server**:
– In the station list, search for **“ECHOTEST”**
– Connect
– Press **Transmit (PTT)** and speak
– The server will play your audio back to you
If you hear yourself clearly, your setup is working.
—
8. Optional: Add Favorites
– Search for your local repeater or link node
– Tap the **star icon** to save it
– This makes it easy to reconnect later
—
Conclusion
👍 You’re Ready to Make QSOs
Once validated and connected, you can link to repeaters, conferences, or individual stations worldwide. Have fun exploring your worldwide neighborhood.


Thanks for doing this Rob. I will give it a try. It seems the only radio I am using so far is my phone 😒 We can get into that another time. This service sounds really interesting and it’s another example of the amateur radio -to- Internet integration that is going to help keep the interest in radio alive.